So i bought my 2nd Ugreen DXP2800 and could finally do some more testing 😀 and perform a writeup.
You can find the updated version in my Github GIST How to install TrueNAS SCALE 25.10 on a partition instead of the full disk + mirror boot and data partition at a later stage
Because the TrueNAS installer doesn’t support usage of anything less than the full drive, a lot of space will be wastetd installing it to a large SSD/NVMe. TrueNas OS will only use a few GB for it’s system files so installing to a 16GB partition is sufficient.
NOTE: As of this writing, TrueNAS Scale recommends a 20GB boot drive. For more details, visit https://www.truenas.com/docs/scale/gettingstarted/install/installingscale/
This guide covers for TrueNas Scale 24.04 to 25.10
You will have to modify the installer script before starting the installation process.
- Boot TrueNAS Scale installer from USB/ISO
- Select shell in the first menu (instead of installing)
- While in the shell, find and open the installer and edit using vi
For TrueNasScale before 24.10 – https://github.com/truenas/truenas-installer/blob/release/24.04.2.5/usr/sbin/truenas-install#L460
vi /usr/sbin/truenas-install
For TrueNasScale 24.10+ – https://github.com/truenas/truenas-installer/blob/76a188e9048f26bca1a88f5d46a552742b3db286/truenas_installer/install.py#L81
vi /usr/lib/python3/dist-packages/truenas_installer/install.py
- in vi you can use “set number” to easily see on what line of code you are
- make the changes on line 81 as follows:
await run(["sgdisk", "-n3:0:+16GiB", "-t3:BF01", disk.device]) - exit vi and type exit to return from the shell
- Select Install/Upgrade from the Console Setup menu (without rebooting, first) and install to NVMe drive.
- Remove the USB and reboot.
Next we re-partition the nvme. You can perform this next setp on console or enable ssh via TrueNas Gui
- Login to the linux shell.
- Verify the created partition and their alignment
truenas_admin@truenas[~]$ sudo fdisk -l /dev/nvme0n1
Disk /dev/nvme0n1: 931.51 GiB, 1000204886016 bytes, 1953525168 sectors
Disk model: CT1000P3PSSD8
Units: sectors of 1 * 512 = 512 bytes
Sector size (logical/physical): 512 bytes / 512 bytes
I/O size (minimum/optimal): 512 bytes / 512 bytes
Disklabel type: gpt
Disk identifier: 67X88FDC-3A4E-43FC-BA2F-AD279703FBFF

Device           Start      End  Sectors  Size Type
/dev/nvme0n1p1    4096     6143     2048    1M BIOS boot
/dev/nvme0n1p2    6144  1054719  1048576  512M EFI System
/dev/nvme0n1p3 1054720 34609151 33554432   16G Solaris /usr & Apple ZFS


truenas_admin@truenas[~]$ for p in 1 2 3; do sudo parted /dev/nvme0n1 align-check optimal $p; done
1 aligned
2 aligned
3 aligned
- create a partition allocating the rest of the disk.
(parted) name 3 boot-pool
(parted) mkpart ssd-pool 17304576kiB 100%
(parted) print
Model: CT1000P3PSSD8 (nvme)
Disk /dev/nvme0n1: 976762584kiB
Sector size (logical/physical): 512B/512B
Partition Table: gpt
Disk Flags:

Number  Start        End           Size          File system  Name       Flags
 1      2048kiB      3072kiB       1024kiB                               bios_grub, legacy_boot
 2      3072kiB      527360kiB     524288kiB     fat32                   boot, esp
 3      527360kiB    17304576kiB   16777216kiB   zfs          boot-pool
 4      17304576kiB  976761856kiB  959457280kiB               ssd-pool

truenas_admin@truenas[~]$ for p in 1 2 3 4; do sudo parted /dev/nvme0n1 align-check optimal $p; done
1 aligned
2 aligned
3 aligned
4 aligned
- setup the zpool for the UI to pick it up
sudo zpool create ssd-pool /dev/nvme0n1p4 sudo zpool export ssd-pool
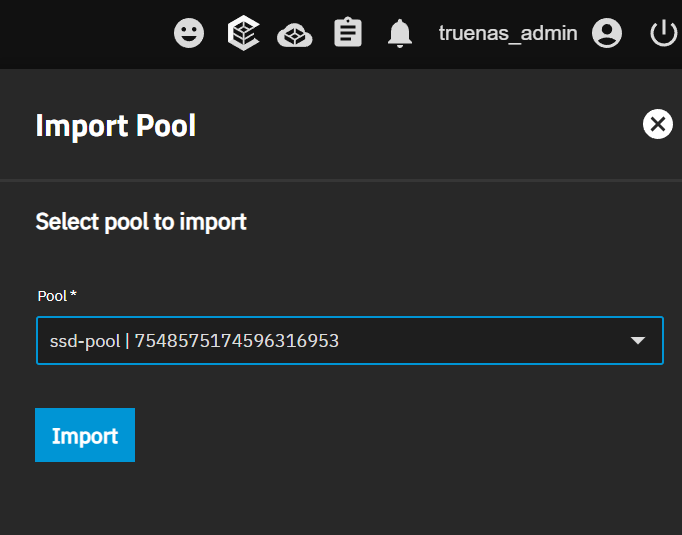
use the TrueNas Gui -> Storage Dashboard -> Import Pool