When building my three-node Proxmox cluster based on HP EliteDesk mini PCs, I wanted more than just an automated installation process. One of my main goals was to get hands-on experience with PXE booting and understand how bare-metal provisioning works in practice. Learning by doing rather than simply following a guide ..
Instead of using USB sticks and manually stepping through the installer for each node, I built a lightweight bare-metal PXE provisioner running inside a Debian 13 LXC container. The result is a reusable platform for deploying Proxmox hosts consistently while providing a playground for exploring PXE / automation.
You can find my project at the following github page: https://github.com/MRi-LE
The project is intentionally focused on one thing:
Provision exactly one known physical machine at a time, using a verified Proxmox artifact, while failing closed for every unknown or unarmed client.
This article shows the architecture, the normal workflow, the problems I encountered and the improvements that are now on the roadmap.
Important: This is destructive infrastructure tooling. An armed profile can repartition and overwrite the target disk. Always verify the physical machine, MAC address, UUID and target disk before starting an installation!
1.) What I Wanted to Build
The goal was not to create a general-purpose enterprise provisioning platform.
I wanted a small and auditable homelab tool that could:
- keep my existing router as the authoritative DHCP server;
- add PXE without replacing the existing network setup;
- boot UEFI x86-64 machines through iPXE;
- prepare one reusable Proxmox installation bundle;
- generate a private unattended
answer.toml; - allow only one armed target at a time;
- deny unknown, expired or mismatched clients;
- keep secrets and generated answers out of the public PXE directory.
My final test environment uses:
- Debian 13 Trixie in an LXC;
- Fritz!Box DHCP;
dnsmasqin ProxyDHCP/TFTP mode;snponly.efifor iPXE chainloading;- HTTP delivery for the larger boot assets;
- Proxmox VE 9.2-1;
- three HP EliteDesk 705 G4 Mini PCs.
I use example addresses throughout this article. Replace them with your own network values.
PXE server:      192.168.10.20
Target 1:        192.168.10.31
Target 2:        192.168.10.32
Target 3:        192.168.10.33
Provisioning LAN: 192.168.10.0/24
2.) The Architecture
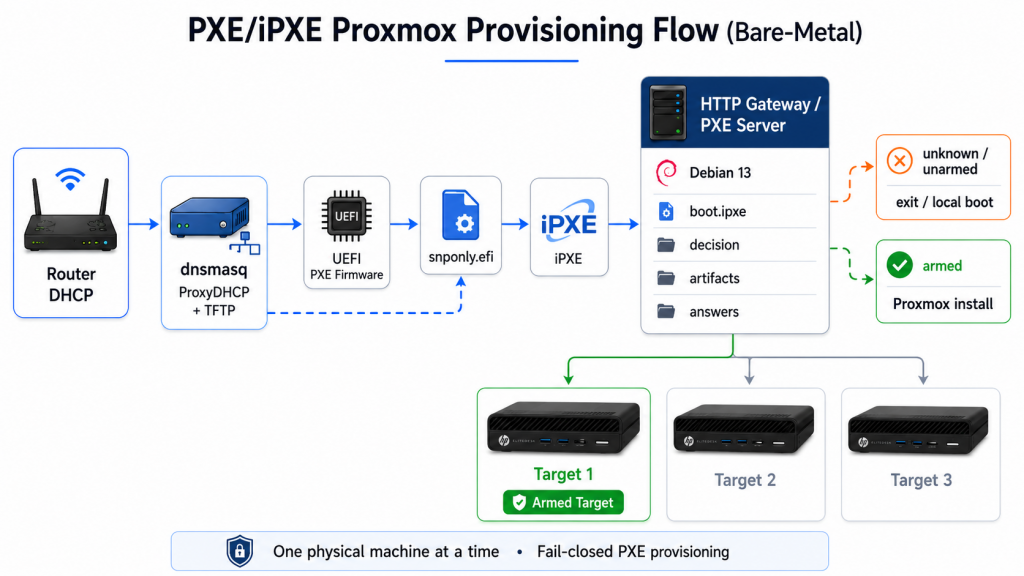
The existing DHCP server remains responsible for normal address assignment. dnsmasq only provides the extra PXE information required by compatible clients.
The simplified boot flow looks like this:
UEFI firmware
  → existing DHCP server assigns an address
  → dnsmasq ProxyDHCP advertises network boot
  → TFTP loads snponly.efi
  → iPXE loads boot.ipxe over HTTP
  → gateway checks MAC and optional UUID
  → unknown or unarmed client receives exit
  → armed client receives the Proxmox boot script
  → installer downloads kernel, initrd and prepared ISO
  → installer POSTs hardware information
  → gateway validates the target and returns answer.toml
This split is important because TFTP is fine for a small chainloader, but HTTP is much better for the Proxmox kernel, initrd and ISO.
The project also separates the generic PXE core from operating-system-specific logic:
- the core handles targets, profiles, artifacts, releases, sessions and authorization;
- the Proxmox provider prepares the boot bundle and unattended answer;
- future operating systems would need their own provider.
A random ISO cannot simply be treated as a universal PXE image. Different installers require different kernels, initrds, boot arguments and answer mechanisms.
3.) Installing the PXE Server
The supported server is Debian 13 with systemd. I use a root shell, so the commands intentionally omit sudo.
apt update

apt install --no-install-recommends -y \
  ca-certificates \
  curl \
  dnsmasq \
  git \
  iproute2 \
  openssh-server \
  openssl \
  passwd \
  procps \
  python3 \
  python3-jinja2 \
  python3-yaml \
  tzdata \
  xorriso
The Proxmox provider also needs proxmox-auto-install-assistant from the matching Proxmox repository. This tool converts and validates the installer assets used for automated deployment.
Clone the project into a persistent location:
cd /home/git
git clone <your-repository-url> baremetal-pxe-provisioner
cd baremetal-pxe-provisioner
Create the local configuration files:
cp config/server.example.yml config/server.local.yml
cp config/targets.example.yml config/targets.local.yml
cp config/secrets.example.env config/secrets.local.env

chmod 600 config/secrets.local.env
The local files are intentionally ignored by Git:
config/server.local.yml
config/targets.local.yml
config/secrets.local.env
data/
This allows the reusable project code to remain in Forgejo without committing local IP addresses, password hashes, SSH keys or downloaded artifacts.
4.) Pinning the iPXE Chainloader
One lesson from this project is that boot infrastructure should not depend on a mutable upstream download during every deployment.
Download the selected chainloader once:
mkdir -p data/chainloaders

curl -fL \
  https://boot.ipxe.org/x86_64-efi/snponly.efi \
  -o data/chainloaders/snponly.efi

sha256sum data/chainloaders/snponly.efi
Then configure the local file and its verified checksum:
ipxe:
  chainloader: snponly.efi
  source: data/chainloaders/snponly.efi
  sha256: <verified-lowercase-sha256>
This means the PXE service always uses the exact chainloader that was tested. A future upstream change under the same filename cannot silently alter the boot path.
NOTE: Do not replace a trusted checksum simply because a newly downloaded file reports a different value. First investigate why the bytes changed.
5.) Defining the Proxmox Artifact and Target
The project separates three concepts:
- Artifact — the Proxmox installer version.
- Profile — installation choices such as filesystem and target disk.
- Target — the physical machine identity and network configuration.
A simplified target example could look like this:
targets:
  lab-server-01:
    mac: "00:11:22:33:44:55"
    system_uuid: "11111111-2222-3333-4444-555555555555"
    hostname: "pve-node-01"
    preferred_disk: "nvme0n1"

    network:
      address: "192.168.10.31/24"
      gateway: "192.168.10.1"
      dns:
        - "192.168.10.1"
The destructive confirmation uses the exact target ID. This prevents an operator from accidentally arming a different machine through a copied command.
The password hash and public SSH key belong in config/secrets.local.env:
umask 077

HASH="$(openssl passwd -6)"
printf "PVE_ROOT_PASSWORD_HASH='%s'\n" "$HASH" \
  > config/secrets.local.env

printf "PVE_ROOT_SSH_KEY='%s'\n" \
  "$(cat ~/.ssh/id_ed25519.pub)" \
  >> config/secrets.local.env

unset HASH
chmod 600 config/secrets.local.env
umask 022
Never store a plaintext password or SSH private key in the repository.
6.) Preparing the Reusable Proxmox Bundle
The source ISO is downloaded and cached once. The provider then prepares a reusable PXE bundle containing the required boot files.
python3 tools/pxe.py artifact sync proxmox-ve-9.2-1
python3 tools/pxe.py artifact prepare proxmox-ve-9.2-1
python3 tools/pxe.py artifact verify proxmox-ve-9.2-1
The resulting structure looks similar to this:
data/
├── downloads/
│   └── proxmox-ve-9.2-1/
│       └── proxmox-ve_9.2-1.iso
└── bundles/
    └── proxmox-ve-9.2-1/
        ├── boot.ipxe
        ├── vmlinuz
        ├── initrd.img
        ├── proxmox-ve_9.2-1-auto-from-http.iso
        └── manifest.json
The workflow has three deliberate stages:
syncverifies the downloaded source ISO;preparecreates the provider-specific PXE bundle;verifyrecalculates the hashes and validates the bundle again.
This makes the artifact reusable across multiple targets. Adding another server normally does not require rebuilding the ISO.
7.) Installing the Services and Publishing a Release
First validate the configuration and run the tests:
python3 tools/pxe.py validate
python3 -m unittest discover -s tests -v
Then install the runtime and publish the active release:
python3 tools/pxe.py install-services
python3 tools/pxe.py publish
python3 tools/pxe.py doctor
python3 tools/pxe.py status
The installed components include:
/etc/baremetal-pxe/                 private configuration and secrets
/etc/dnsmasq.d/baremetal-pxe.conf   ProxyDHCP and TFTP configuration
/usr/local/lib/baremetal-pxe/       gateway and provider code
/srv/tftp/snponly.efi               pinned chainloader
/srv/pxe/releases/                  immutable published releases
/srv/pxe/current                    active release symlink
/run/baremetal-pxe/                 temporary session and answer state
install-services installs the code and configuration. publish creates an immutable release, activates it through /srv/pxe/current, restarts the services and verifies the gateway identity.
Suggested image: Terminal output from validate, publish, doctor and status.
8.) Always Test the Unarmed Path First
The most important safety test is not a successful installation. It is proving that an unarmed machine does not start the installer.
Confirm there is no active session:
python3 tools/pxe.py statusWatch both services:
journalctl -fu dnsmasqjournalctl -fu baremetal-pxeNow power on the target without arming it.
The expected flow is:
UEFI firmware
→ PXE
→ snponly.efi
→ boot.ipxe
→ decision request
→ #!ipxe
→ exit
→ local boot
No installer should start.
This test proves that network boot can remain available without turning every reboot into an accidental reinstallation.
9.) Arming One Physical Machine
Arm exactly one target and confirm the target name literally:
python3 tools/pxe.py arm lab-server-01 \
  --profile proxmox-ve-ext4 \
  --confirm-target lab-server-01
Then power on only that physical machine.
Check the session:
python3 tools/pxe.py statusA successful journal sequence looks similar to this:
BOOT GRANTED target=lab-server-01
GET /artifacts/proxmox-ve-9.2-1/boot.ipxe       200
GET /artifacts/proxmox-ve-9.2-1/vmlinuz         200
GET /artifacts/proxmox-ve-9.2-1/initrd.img      200
GET /artifacts/proxmox-ve-9.2-1/<prepared-iso>  200
ANSWER SERVED target=lab-server-01 provider=proxmox
POST /answers/proxmox                           200
BOOT GRANTED and ANSWER SERVED are logged prominently because they represent security-relevant authorization events. In this context, they indicate success.
The session can be cancelled at any time:
python3 tools/pxe.py disarm10.) Arming Does Not Force PXE
This caused some confusion during the reinstall of my first node.
The arm command only tells the gateway:
Allow this known target to install if it requests PXE.It does not:
- reboot the machine;
- change its firmware boot order;
- override an existing Proxmox boot entry;
- remotely force network boot.
An operating-system installer may create a named UEFI entry such as proxmox or OS Boot Manager. Some firmware prefers that entry even when IPv4 network boot was previously first.
For a controlled reinstall on the HP EliteDesk, the reliable method is:
Power on
→ press Esc
→ press F9
→ select UEFI IPv4 Network Boot
From a running Linux system, a one-time BootNext entry can also be used:
efibootmgr -v
efibootmgr -n <network-boot-number>
reboot
BootOrder is persistent. BootNext is consumed once and is therefore ideal for a reinstall.
NOTE: Generic
available DHCP subnetmessages in the dnsmasq journal do not prove that the armed target attempted PXE. Look for the target MAC,PXEClient,/boot.ipxe,/decisionandBOOT GRANTED.
11.) Real Problems I Encountered
The initial ramdisk was too small
The Proxmox installer initially failed inside the early root filesystem with write and no-space errors before it could retrieve the unattended answer.
The prepared boot configuration now sets:
initramfs_options=size=4GThis gives the installer enough early userspace capacity for the PXE workflow.
The answer payload format changed
The Proxmox HTTP answer request can use more than one hardware-information structure. The provider now accepts both the older flat structure and the newer versioned layout, while still requiring:
- product
pve; - the configured target MAC;
- the configured DMI UUID when UUID matching is enabled.
Publish completed before the service was ready
A release could be activated successfully, but the immediate health request occasionally arrived before the gateway had bound TCP port 8080.
A manual retry a few seconds later passed:
python3 tools/pxe.py doctor
python3 tools/pxe.py status
The roadmap replaces this workaround with a bounded readiness check and rollback to the previous release if startup never becomes healthy.
Old releases filled the PXE server
Every published release currently contains another copy of the large Proxmox installer artifact.
On my 20 GiB PXE LXC, several old releases eventually caused:
OSError: [Errno 28] No space left on deviceThe safe temporary policy is:
keep active release
+ keep newest inactive fallback
+ delete older inactive releases
Never delete:
/srv/pxe/current
the release referenced by /srv/pxe/current
an active provisioning session
Before publishing, check:
df -h /
readlink -f /srv/pxe/current

find /srv/pxe/releases \
  -mindepth 1 \
  -maxdepth 1 \
  -type d \
  -printf '%f\n' |
sort
The roadmap adds publication locking, capacity preflight, a configurable free-space reserve and safe release list / release prune commands.
12.) Security Model and Current Limitations
The strongest safety property is simple:
Only one explicitly armed target may install, and every ambiguous state should fail closed.
Unknown or unarmed clients receive:
#!ipxe
exit
The current version still has an important management limitation.
Public PXE traffic and the management routes currently share one HTTP listener. /arm, /disarm and /status are accepted only when the kernel-reported TCP peer is loopback.
A remote LAN client cannot fake that by setting X-Forwarded-For, because the check does not trust HTTP headers. However:
- another local process can connect through loopback;
- an untrusted local user could attempt the management endpoints;
- a reverse proxy on the same PXE host could forward remote traffic and appear as
127.0.0.1.
Therefore, never proxy the management routes through Nginx, HAProxy, a tunnel or a port forward.
The planned hardened design moves administration to a permission-controlled Unix-domain socket and removes state-changing management routes from the public PXE listener.
Other current limitations include:
- MAC addresses are inventory identifiers, not cryptographic authentication;
- the provisioning LAN is assumed to be controlled;
- Secure Boot integration is not implemented;
- concurrent target installations are intentionally unsupported;
- version one has only a complete Proxmox provider.
For a homelab, I also keep the physical rule simple: power on only the intended installation target.
My Verdict
This project started as a way to avoid repeating the Proxmox installer on three mini PCs. It turned into a useful exercise in getting hands on PXE and designing a destructive automation safely.
The best parts are not the unattended installation itself. They are the controls around it:
- one machine at a time;
- exact destructive confirmation;
- unarmed clients fail closed;
- artifacts are reusable and checksum verified;
- private answers never enter the public PXE release;
- every successful authorization is visible in the journal.
There are still improvements to make, particularly around management isolation, session continuity and release retention. But the current design already gives me a repeatable way to redeploy physical Proxmox nodes without reinstalling from USB media or manually clicking through every installer screen.